The Android Bluetooth Connection
Suppose someone came to talk to you and said, “I need your help. I have a Raspberry Pi-based robot and I want to develop a custom Android app to control it.” If you are like me, you’ll think about having to get the Android developer tools updated, and you’ll wonder if you remember exactly how to sign a manifest. Not an appealing thought. Sure, you can buy things off the shelf that make it easier, but then it isn’t custom, and you have to accept how it works. But it turns out that for simple things, you can use an old Google Labs project that is, surprisingly, still active and works well: MIT’s App Inventor — which, unfortunately, should have the acronym AI, but I’ll just call it Inventor to avoid confusion.
What’s Inventor? It lives in your browser. You lay out a fake phone screen using drag and drop, much like you’d use QT Designer or Visual Basic. You can switch views and attach actions using a block language sort of like Scratch. You can debug in an emulator or on your live phone wirelessly. Then, when you are ready, you can drop an APK file ready for people to download. Do you prefer an iPhone? There’s some support for it, although that’s not as mature. In particular, it appears that you can’t easily share an iPhone app with others.
Is it perfect? No, there are some quirks. But it works well and, with a little patience, can make amazingly good apps. Are they as efficient as some handcrafted masterpiece? Probably not. Does it matter? Probably not. I think it gets a bad rep because of the colorful blocks. Surely it’s made for kids. Well, honestly, it is. But it does a fine job, and just like TinkerCad or Lego, it is simple enough for kids, but you can use it to do some pretty amazing things.
How Fast?
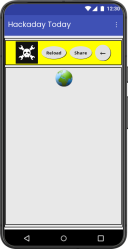
How fast is it to create a simple Android app? Once you get used to it, it is very fast, and there are plenty of tutorials. Just for fun, I wrote a little custom web browser for my favorite website. It is hard to tell from the image, but there are several components present. The web browser at the bottom is obvious, and there are three oval buttons. The Hackaday logo is also clickable (it takes you home). What you can’t see is that there is a screen component you get by default. In there is a vertical layout that stacks the toolbar with the web browser. Then the toolbar itself is a horizontal layout (colored yellow, as you can see).
The black bar at the bottom and the very top bar are parts of the fake phone, although you can also pick a fake monitor or tablet if you want more space to work.
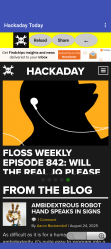
What you can’t see is that there are two more hidden components. There’s a clock. If you are on the home page for an hour, the app refreshes the page. There’s also a share component that the share button will use. You can see three views of the app below. There are three views: a design view where you visually build the interface, a block view where you create code, and the final result running on a real phone.
Code
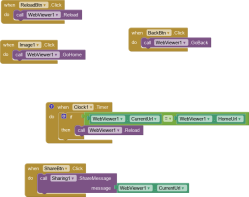
Putting all that on the screen took just a few minutes. Sure, I played with the fonts and colors, but just to get the basic layout took well under five minutes. But what about the code? That’s simple, too, as you can see.
The drab boxes are for control structures like event handlers and if/then blocks. Purple boxes are for subroutine calls, and you can define your own subroutines, although that wasn’t needed here. The green blocks are properties, like the browser’s URL. You can try it yourself if you want.
Rather than turn this into a full-blown Inventor tutorial, check out any of the amazingly good tutorials on the YouTube channel, like the one below.
youtube.com/embed/eSvtXWpZ6os?…
Half the Story
Earlier, I mentioned that your friend wants a robot controller to talk to a Raspberry Pi. I was surprised at how hard this turned out to be, but it wasn’t Inventor’s fault. There are three obvious choices: the system can make web requests, or it can connect via Bluetooth. It can also work with a serial port.
I made the mistake of deciding to use Bluetooth serial using the Bluetooth client component. From Inventor’s point of view, this is easy, if not very sophisticated. But the Linux side turned out to be a pain.
There was a time when Bluez, the Linux Bluetooth stack, had a fairly easy way to create a fake serial port that talked over Bluetooth. There are numerous examples of this circulating on the Internet. But they decided that wasn’t good for some reason and deprecated it. Modern Linux doesn’t like all that and expects you to create a dbus program that can receive bus messages from the Bluetooth stack.
To Be Fair…
Ok, in all fairness, you can reload the Bluetooth stack with a compatibility flag — at least for now — and it will still work the old way. But you know they’ll eventually turn that off, so I decided I should do it the right way. Instead of fighting it, though, I found some code on GitHub that created a simple client or server for SPP (the serial port profile). I stripped it down to just work as a server, and then bolted out a separate function bt_main() where you can just write code that works with streams. That way, all the hocus pocus — and there is a lot of it — stays out of your way.
You can find my changes to the original code, also on GitHub. Look at the spp_bridge.c file, and you’ll see it is a lot of messy bits to interact with Bluez via dbus. It registers a Profile1 interface and forks a worker process for each incoming connection. The worker runs the user-defined bt_main() function, which will normally override. The worker reads from the Bluetooth socket and writes to your code via a normal FILE *. You can send data back the same way.
Here’s the default bt_main function:
<div>
<pre>int bt_main(int argc, char *argv[], FILE *in, FILE *out) {
// Default demo: echo lines, prefixing with "ECHO: "
fprintf(stderr,"[bt_main] Default echo mode.\n");
setvbuf(out,NULL,_IOLBF,0);
charbuf[1024];
while(fgets(buf,sizeof(buf),in)){
fprintf(stderr,"[bt_main] RX: %s",buf);
fprintf(out,"ECHO: %s",buf);
fflush(out);
}
fprintf(stderr,"[bt_main] Input closed. Exiting.\n");
return0;
}</pre>
In retrospect, it might have been better to just use the compatibility flag on the Bluez server to restore the old behavior. At least, for as long as it lasts. This involves finding where your system launches the Bluez service (probably in a systemd service, these days) and adding a -c to the command line. There may be a newer version of rfcomm that supports the latest Bluez setup, too, but KDE Neon didn’t have it.
On the other hand, this does work. The bt_main function is easy to write and lets you focus on solving your problem rather than how to set up and tear down the Bluetooth connection.
Next Time
Next time, I’ll show you a more interesting bt_main along with an Android app that sends and receives data with a custom server. You could use this as the basis of, for example, a custom macropad or an Android app to control a robot.